Case studies
Novitee Web
Installation
First, you can get the project source code at the Novitee Website GitHub or run the git clone command like this:
git clone git@github.com:GlifeRnD/novitee_next.git
Then you can follow the Installation Guide to install all the dependencies and start the app.
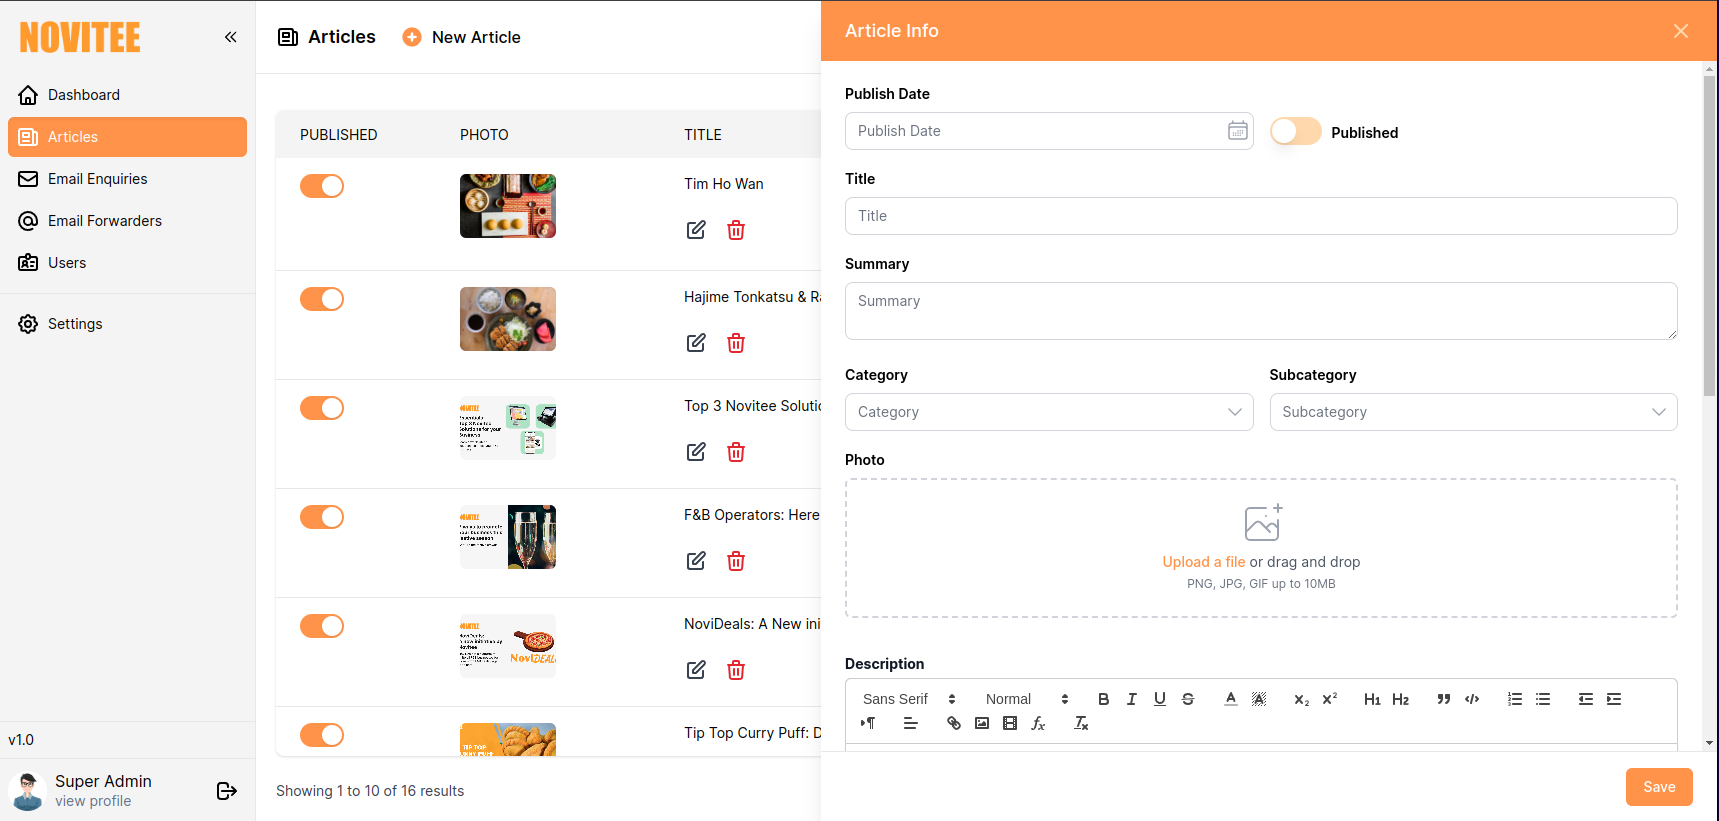
Article Forms
Novitee Website is basically a static website with just one dynamic part, a blog system called Essential, so Article Form is where most CRUDS operations will happen.
Once the app started, you can log into Admin Page and open the Article Form by going to Articles Management and click the New Article button.
Validations
Although the Admin Page is for internal uses only, Back-end(BE) and Front-end(FE) should be separated completely and BE should never trust in the FE, this will make you a good behavior for more complicated projects in the future when your BE might be received requests from multiple FE and even from third-parties.
First, to store Article information in the database, you will need a Model to map and store the Article to the MongoDB Documents. In the Novitee Website project, Article is mapped to Post model, you can go and check out the Post model located at /backend/models/Post.js
const Post = mongodb.createModel(
  "posts",
  {
    slug: "[String]|Required",
    title: "String|Required",
    photoURL: "String|Required",
    description: "String|Required",
    summary: "String",
    status: "String",
    publishedAt: "Date",
    categoryId: "ID",
    subcategoryId: "ID",
    creatorId: "ID",
    relatedIds: "[ID]",
    meta: "Object|Required",
  },
  {
    includes: {
      ...
    },
    indexes: [
      {
        key: { slug: 1 },
        unique: true,
      },
    ],
  }
)
Some fields are required when an admin creates a new article like title, description, photoURL or meta, so you can see these fields will have a Required annotation. And slug is generated from BE, but still, you can also mark it as Required field in case your co-developers forget to generate one.
In our case, the slug must be unique because FE is using the slug to fetch the right posts, so in the indexes options, you can see the slug is indexed as ascending single field with unique option set to true. This will make sure when someone creates or updates a document with an existing slug, an error will be thrown and no changes will be made.
One to Many relationships
In this project, an Article belongs to a category, a subcategory and is created by a creator. So how can we define those One to Many relationships?
First, you need to create keys inside Post model which refer to the related models, so that in the future when we want to get the related documents, we can use these keys as the references. We created 3 keys categoryId, subcategoryId and creatorId
const Post = mongodb.createModel(
  "posts",
  {
    ...
    categoryId: "ID",
    subcategoryId: "ID",
    creatorId: "ID",
  },
  ...
},
The relationship keys should have the data type ID since their value will be the id from other related documents.
Now to resolve and include the related items to the Article, we create includes rules inside the Post model. For example, creator will be resolved using data from users model, whose id is the same as creatorId key
const Post = mongodb.createModel(
  "posts",
  {
    ...
    categoryId: "ID",
    subcategoryId: "ID",
    creatorId: "ID",
  },
  includes: {
    category: { ref: "categories", key: "categoryId" },
    subcategory: { ref: "subcategories", key: "subcategoryId" },
    creator: { ref: "users", key: "creatorId" },
  }
},
Many to Many relationships
In Post model, there's another relationship called relatedPosts which indicates articles that are related to the current article. An article can be related to multiple articles, so in this case, the relatedIds should be an Array of ID type. And also, for resolving, the include should be using keys instead of key. The returned data after resolving will be an array of matched data. So, the relatedPosts will be resolved using data from posts model, whose id is in the relatedIds list.
const Post = mongodb.createModel(
  "posts",
  {
    ...
    relatedIds: "[ID]",
  },
  includes: {
    ...
    relatedPosts: { ref: "posts", keys: "relatedIds" }
  }
},
Now we go to the Subcategory model, since a Post can belong to a Subcategory, then you might be wondering how can I get all the Posts related to the current Subcategory. Because the Post model already had the reference key to the Subcategory model, we don't have to add another key here. We can use the defined key from Post model to resolve the relationship by using it as the foreignKey in the include definition like this
const Subcategory = mongodb.createModel(
  "subcategories",
  {
    ...
  },
  includes: {
    posts: { ref: "posts", foreignKey: "subcategoryId" }
  }
)
So the posts will be resolved using data from posts model whose subcategoryId is the same as the current subcategory's id
CRUDS
To implement the CRUD operations for Post model, a posts service (controller) is created and extends from the CRUDService and passed in Post to the super() method inside constructor to indicate that we are creating CRUD handlers for model Post. Check out the /backend/services/posts.js
Create
Server Side
For Post, we need to inject the creatorId when creating, and it should be the one who's calling the request, so in posts service, instead of using the default create method from CRUDService we need to override it. Here, we check if the user is logged in or not, and if yes, we add a creatorId directly to the data object inside req.body. So that when we call super.create() the data object will be carried on to the default method.
export default class Posts extends CRUDService {
  constructor() {
    super("Post")
  }

  async create(req, res) {
    const { data } = req.body || {}
    if (!req.user) {
      return res.status(401).json({
        success: false,
        error: "Unauthorized action",
      })
    }
    // injecting to data object
    data.creatorId = req.user._id
    // then calling default method to carry on handling
    super.create(req, res)
  }

  ...
}
Client Side
On the client side, we use the useMutation() hooks to create a function that will send a POST request to the /api/v1/posts endpoint, and the passed-in parameters will be used as the body of the request. The POST request will be mapped and handled by the create method above.
// /src/components/dashboard/Article/Form.js

function ArticleForm(...) {
  const [createArticleMutation] = useMutation({
    method: "POST",
    url: "/api/v1/posts"
  })

  async function handleSave(values) {
    let saveArticle = createArticleMutation
    let variables = { data: ... }

    try {
      const { error } = await saveArticle(variables)
      if (error) {
        throw new Error(error)
      }
      ...
    } catch (error) {
      displayMessage("error", error.message)
    }
  }
}
Read
Server Side
Usually, we don't have to override the read method, but Post read method has a special case when end users reading an essential article, we need to fetch the post using the slug property. So again in the posts service, we will override the default read method, add in checking for slug case and call the super.read to carry on handling the request.
export default class Posts extends CRUDService {
  // slug and id share the same endpoint /api/v1/posts/{id|slug}
  async read(req, res) {
    const { params } = req.query
    const [, id] = params || []
    if (id) {
      let objectId, data
      try {
        objectId = ObjectId(id)
      } catch (error) {
        objectId = null
      }
      // if id cases
      if (objectId) {
        return await super.read(req, res)
      } else {
      // if slug cases
        data = await this.model.findOne({ slug: { $in: [id] } })
      }
      return res.status(200).json({
        success: true,
        data,
      })
    } else {
      await super.read(req, res)
    }
  }
}
Client Side
For the client side, we have 2 places where the posts endpoints are called, one from the admin article listing page, and one from the main website on the essentials page. You can check the following files /src/components/dashboard/Article/index.js and /src/components/website/Blog/CollectionBlog/index.js
First, let's take a look at the admin page. To send a GET request to the server and get the post list, we use the useQuery hook and pass in with the endpoint and queries. The passed-in arguments should be an array so that when there're any changes in the array, a refetch will be triggered.
// /src/components/dashboard/Article/index.js
const variables = {
  first: pageSize,
  skip: pageSkip * pageSize,
  filter: articleFilters,
}

const {
  data,
  isValidating: isFetching,
  mutate: refetch,
} = useQuery(["/api/v1/posts", variables])

const posts = data.data
From the main website essential page, we used a different approach to fetch the data by using useSWRInfinite hook, but basically, it shares the same idea as the useQuery hook. The first argument is the endpoint and queries but generated by a function, the second argument is the fetcher (Axios in this case) to send the request, and the last one is the hook options, you can see SWR Infinite Documents for more information
// /src/components/website/Blog/CollectionBlog/index.js
const {
  data = [],
  size,
  setSize,
  isValidating,
} = useSWRInfinite(
  (pageIndex, previousPageData) => {
    if (previousPageData && !previousPageData?.data?.length) {
      return null
    }
    const variables = {
      first: pageSize,
      skip: pageIndex * pageSize,
      filter: filter,
      orderBy,
    }
    return ["/api/v1/posts", variables]
  },
  fetcher,
  { initialSize: 2 }
)
Update, Delete
Basically, Update and Delete are the same as Create method, you just need to remember to pass in the correct request method for corresponding operations, PUT or PATCH for Update and DELETE for Delete method.
// src/components/dashboard/Article/Listing.js

const [updateArticleMutation] = useMutation({
  method: "PATCH",
  url: "/api/v1/posts/:id",
})

const [removeArticleMutation] = useMutation({
  method: "DELETE",
  url: "/api/v1/posts/:id",
})
Subscription
On the server side, once you create a model, the subscription is already ready to use. To use it on the client use the useSubscription hook and pass in the collection name and the subscribed actions. For example, on the admin Article management page, we call a useSubscription hook right after the useQuery hook
// /src/components/dashboard/Article/index.js

const {
  data,
  isValidating: isFetching,
  mutate: refetch,
} = useQuery(["/api/v1/posts", variables])

useSubscription({
  refetch,
  collection: "posts",
  tags: ["create", "update", "delete"]
})
Here, we subscribed for changes from posts collection and will be notified if there are any create, update or delete actions were made. If there are, the refetch function will be called to fetch the new data.